18 mins read
Dynamic Routes on GitHub Pages using SvelteKit and 404 Trickery
Introduction
The greatest thing about GitHub Pages is that it’s absolutely free to deploy static websites, unlike other alternatives such as Vercel, Netlify and so on. However, there’s a catch – and that’s the word “static”, you can only deploy websites that are compiled into a statically generated website.
There is no way to deploy a website with some kind of dynamic routing. Or is there?
The Problem
When I built shareti.me (to solve the problem of handling timezones that I’ve personally faced), There was the important part of sharing URLs with embedded time.
If I were to deploy it on Github Pages, it meant that I won’t be able to use Dynamic routing, and my URL would look like this:
https://shareti.me/?t=2024-04-05_23:00Z+5:30
I like beautiful URLs, and this one looked ugly. Is there a solution that didn’t involve me having to pay for deployment?, a solution in which the URL can be as beautiful as
https://shareti.me/2024-04-06/3:25/+5:30
Turns out there is.
Solution
When you think about it, it seems like an impossible task. GitHub Pages just host the HTML and other static files, there is no way to have a server component which will read the route and load the page dynamically.
To rephrase the question,
How can there be a page that can catch all the URLs and route to the correct one dynamically?
And then the answer becomes obvious: the 404 error page. Fortunately, GitHub lets you add a custom 404 page which is what we are going to use.
Here’s the code for the project if you want to skip the article and just dive right in
1. Create your app (you can skip this if you already have a project)
npm create svelte@latest my-routed-app
# Select Skeleton Project
# Use TypeScript
# Add ESLint + prettier (I like things neat and pretty)
followed by
cd my-routed-app
npm install
git init && git add -A && git commit -m "Initial commit"
npm run dev -- --open
You would see the skeleton project opening in your web browser.
2. Use static adapter.
For GitHub pages, we need to use static site generation (SSG) mode of SvelteKit. Which is done using adapter-static.
Install the adapter with
npm i -D @sveltejs/adapter-static
And then add it to your svelte.config.js replacing the existing adapter.
svelte.config.js:
- import adapter from '@sveltejs/adapter-auto';
+ import adapter from '@sveltejs/adapter-static';
Add a file called +layout.ts to src/routes directory to specify that the app should be pre-rendered with following content.
/src/routes/+layout.ts:
export const prerender = true;
3. Add an error handler at the root route to catch all errors
Next step is telling Svelte how to handle errors which includes 404 Not found.
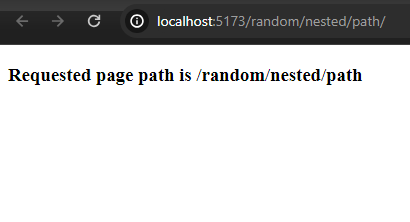
Create a file named +error.svelte in routes with the following content
/src/routes/+error.svelte:
<script lang="ts">
    import { page } from '$app/stores';
</script>

<h3> Requested page path is {$page.url.pathname} </h3>
Save it and then open a random URL in browser http://localhost:5173/random/nested/path/
You would see the following.
4. Add a page which uses the route you passed dynamically.
Create a new folder called pages inside src and add a new file TerminalView.svelte.
(This page here is an example, you would ideally customize as per your app. Where the page handles how to parse the pathname with slashes.)
/src/pages/TerminalView.svelte:
<script lang="ts">
export let pathname: string;
</script>
<div class="container">
<div class="titlebar"></div>
<span>{pathname} $</span>
<span class="blinker"> </span>
</div>
<style>
.container {
background: black;
height: 600px;
width: 800px;
padding: 10px;
margin: auto;
margin-top: 5vh;
border: 1px solid #acacac;
border-radius: 6px;
box-shadow: 0px 0px 20px #acacac;
}
span {
color: rgb(15, 255, 67);
font-family: monospace;
}
.blinker {
opacity: 1;
margin-bottom: -2px;
height: 13px;
margin-left: 6px;
border-left: 2px solid rgb(15, 255, 67);
animation: blinker 0.9s steps(2, start) infinite;
}
@keyframes blinker {
to {
visibility: hidden;
}
}
</style>
Then import it and use the page in +error.svelte
/src/routes/+error.svelte:
<script lang="ts">
	import { page } from '$app/stores';
	import TerminalView from '../pages/TerminalView.svelte';
</script>

<TerminalView pathname={$page.url.pathname} />
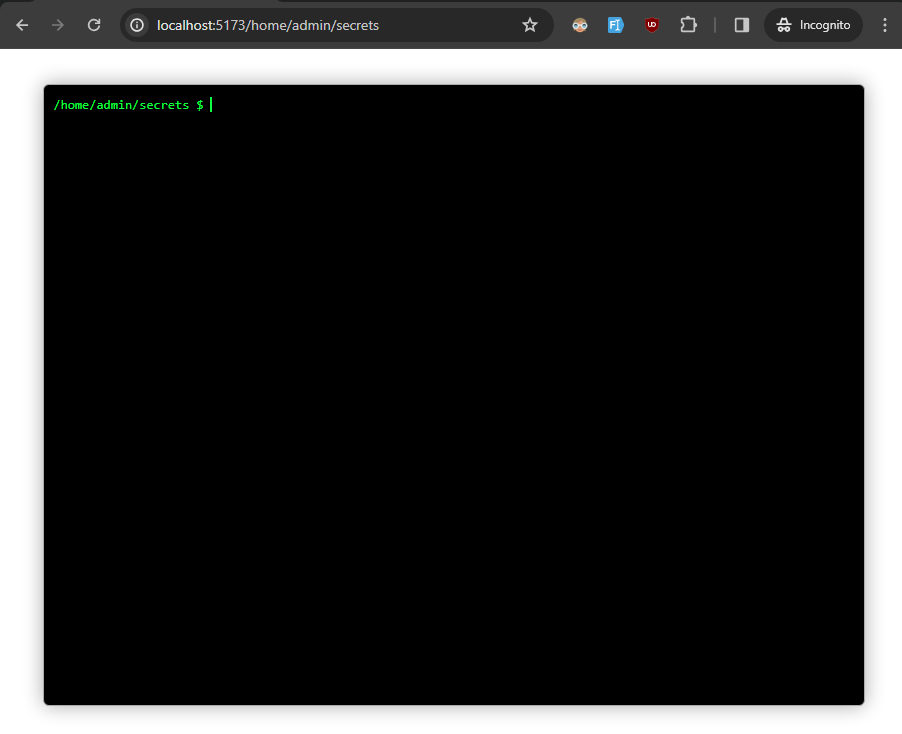
Now if you open a random URL, say http://localhost:5173/home/admin/secrets
You’ll get the following.
5. Push the code to GitHub.
Go to github.com, create a new repository,. Set the origin URL in our project and push the code so far.
git remote add origin git@github.com:[YOUR_USERNAME]/[YOUR_REPOSITORY].git # Replace with your values
git branch -M main
git push -u origin main
6. GitHub pages configuration.
Add the gh-pages package.
npm add -D gh-pages
Add the deploy script to package.json
package.json:
  "build": "vite build",
+ "deploy": "vite build && node ./gh-pages.js",
  "preview": "vite preview",
At the root directory of project, create a file named gh-pages.js with the following content:
gh-pages.js:
import { publish } from 'gh-pages';

publish(
	'build',
	{
		repo: 'https://github.com/[YOUR_USERNAME]/[YOUR_REPOSITORY_NAME].git', // Replace with your values
		user: {
			name: 'Author Name',
			email: 'Author Email'
		},
		dotfiles: true
	},
	() => {
		console.log('Deploy Complete!');
	}
);
7. Providing a custom 404 page.
GitHub Pages calls /404.html by default as the custom error page. So we need to add a route for the same so that the 404 Error gets handled by SvelteKit and not by gh-pages.
in src/routes/, add a new directory named 404.html,
Then create a file named +page.svelte inside 404.html:
/src/routes/404.html/+page.svelte:
<script lang="ts">
	import { page } from '$app/stores';
	import TerminalView from '../../pages/TerminalView.svelte';
</script>

<TerminalView pathname={$page.url.pathname} />
8. Fix relative paths.
Change your svelte.config.js to disable relative paths and set the base path to your repository name, note that depending on your BASE URL, this config may change. If you have a custom domain, the base parameter doesn’t have to be changed. Read using a custom domain to know more.
In my case, the app will be deployed at [ROOT_DOMAIN]/my-routed-app, which is why I gave /my-routed-app
svelte.config.js:
import adapter from '@sveltejs/adapter-static';
import { vitePreprocess } from '@sveltejs/vite-plugin-svelte';

/** @type {import('@sveltejs/kit').Config} */
const config = {
	preprocess: vitePreprocess(),

	kit: {
		paths: {
            base: process.env.NODE_ENV === 'production' ? '/[YOUR_REPOSITORY_NAME]' : '',
			relative: false,
        },
		adapter: adapter()
	}
};

export default config;
9. Deploying
Create an empty file called .nojekyll inside static folder, to tell GitHub Pages to not use Jekyll.
static/.nojekyll:
Run the following
npm run deploy
You might have to give access to GitHub through a sign in popup.
Once the deploy process is complete, your page will be available at the URL specified (which in my case happened to be https://irshadpi.me/my-routed-app/)
Project code and example
All the above code is pushed to repository my-routed-app with correct commits for your reference. If you have any further questions, feel free to ask in comments below.
Drawbacks
The most obvious drawback is that the HTTP Response code for the page would be 404, which is not SEO friendly and will throw errors in the development console. This is more of a gimmick than an actual way to handle dynamic routing.
That said, for for some projects, this might just work well, as it did for ShareTime - https://shareti.me/2024-04-08/4:20/+5:30
Using a Custom Domain
If you have a custom domain, you can set it up by following instructions here.
You will have to add the root domain to your project in the file static/CNAME as used in this case.